
There are two types of waitlists Curacubby can manage. School Level and Program Level...here's how.
MANAGING SCHOOL LEVEL WAITLISTS
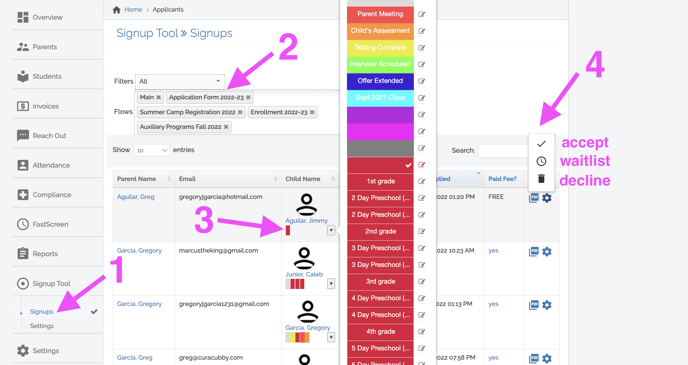
When a student first applies to your school, their application stops in the Sign Ups section. This section is intended to give you the ability to manage the initial acceptance process. To access the primary school waitlist follow these steps:
- Access Signups in the Signups under the Signups
- Use the Filter or "tag" to isolate a specific workflow or view all
- Track progress of a student record using custom milestones
- Accept, Waitlist, or Decline the Student
NOTE: If your sign up form automatically associates a student with a program, the student will be registered for the program even before they are accepted.
- If you do not want a student to be automatically registered for a program until you've reviewed their application, do not associate a sign up option with a program.
- If you do want them to be automatically registered for a program, make sure one of their selections is tied to a program
Existing Students
If a student currently exists in the system, you can see them in both the Student & Sign Up views. Here's what happens to existing students based on your action:
- Accept:
- Accepting an existing student confirms you've seen the sign up. If the sign up was connected to a program, the only thing you'll want to do is make sure the student is connected to a classroom to make reporting & attendance easier
- Waitlist:
- Because the student is already accepted, this will "tag" the sign up as a Waitlist and keep the sign up application in the Sign Ups section. BEWARE- if a sign up flow is a registration style flow (immediately connected to a program), the student will be associated with the program immediately upon submission. If you are removing them from the program and adding them to a waitlist, you'll need to unenroll them from the program. (SEE SECTION BELOW ON MANAGING PROGRAM LEVEL WAITLISTS)
- Decline:
- If you decline an existing student's application, no changes occur to their programs automatically. This is just recording the denial of the application. You'll have to unenroll the student from any programs they shouldn't be enrolled in as well on the student's enrollment.
New Students - New to School
If a student has never attended the school before exists in the system, you can see them in both the Student & Sign Up views. Here's what happens to existing students based on your action:
- Accept:
- Accepting an existing student confirms you've seen the sign up. If the sign up was connected to a program, the only thing you'll want to do is make sure the student is connected to a classroom to make reporting & attendance easier
- Waitlist:
- Because the student is already accepted, this will "tag" the sign up as a Waitlist and keep the sign up application in the Sign Ups section. BEWARE- if a sign up flow is a registration style flow (immediately connected to a program), the student will be associated with the program immediately upon submission. If you are removing them from the program and adding them to a waitlist, you'll need to unenroll them from the program. (SEE SECTION BELOW ON MANAGING PROGRAM LEVEL WAITLISTS)
- Decline:
- If you decline a new student's application, the student is archived in the system and is no longer visible to the school. If you wish to retain visibility of the student for future use, either add them to the Waitlist or accept the student and make sure they aren't enrolled in any programs
MANAGING PROGRAM LEVEL WAITLISTS
There may be times that a student is accepted for some programs and waitlisted for others. Since we need to accept these students to manage them in the system, the School level waitlist won't satisfy our complexity. Here's how to manage these situations:
SYSTEM SETUP
- Create a campus called "Ω Waitlist" in your school settings
- Settings → School → Campus
- Create Classrooms for both the program (tied to the first campus on your list [often named "Default" or "All Students/Participants"]
- Settings → School → Classrooms ⇒ For example:
- "Kids Baking (M,T,W)" ⇒ Default Campus
- "Ω Waitlist - Kids Baking (M,T,W)" ⇒ Ω Waitlist Campus
- Settings → School → Classrooms ⇒ For example:
- Create Universal/Attendance Programs for the dates the program is running. Also add the classroom to the program option to immediately connect enrolled students to the classroom
- Settings → Programs ⇒ For example:
- "Kids Baking (M,T,W)" ⇒ Default Campus
- "Ω Waitlist - Kids Baking (M,T,W)" ⇒ Ω Waitlist Campus
- Settings → Programs ⇒ For example:
FST SETUP
- Make sure your selection